After chatting with some experts at one of my suppliers, I decided to buy two Ubiquiti NanoBridge M5's:
Luckily the two buildings have line of sight, and 400 meters isn't that far, considering that they can handle up to 30km according to their the website!
Anyway, after finally mounting both dishes at the two buildings, and more or less pointing them at each other (we just manually aimed them, didn't use any calibrating tools or stuff like that), we were ready to get the stuff talking to each other.
The radio is powered by a POE (Power Over Ethernet) adapter - this then connects with a normal network cable on your network.
And, once that is done, you basically need to connect to the NanoBridge M5 through your browser - out of the box it has a default IP address of 192.168.1.20, so if you want to connect, the PC you're connecting from should have an IP address in the same subnet - I made mine 196.168.1.50.
Connecting to the NanoBridge was as simple as visiting http://192.168.1.20 in your browser - this connects to the NanoBridge's AirOS software - the default username and password is ubnt - good idea to change this as soon as you can.
The first thing I did was to change the NanoBridge's IP address to be the same as the network it's going to be on (in this case it was the 10.0.0.x range).
Here's how to do that - when logged in on the AirOS software, go to the Network tab:
Once there, your screen should look similar to this:
Change the IP address and netmask and gateway IP to be on your own network range - once you're done with that, click the change button at the bottom - note, the changes aren't saved just yet, a blue bar at the top will appear that looks like this:
Hit the apply button to make the actual changes on your NanoBridge - now, if your IP range is different than the default one, you'll have to change your PC's IP settings back to what it was before, so that you can once again access the device.
Note - by default the protocol for the AirOS software is HTTPS and not HTTP - this might cause some weird warnings in your browser. Also, in my case, it caused Internal Server errors with code 500 - to fix that, I changed the NanoBridge to not use HTTPS anymore, and that solved the problem for me - simply go to the Services tab, and untick the Secure Connection checkbox:
Ok, so now to set up the two NanoBridge's - the first one (the one where the internet will be coming from basically) will be set up as an Access Point, and the other one that will be connecting to the AP will be set up as a Station.
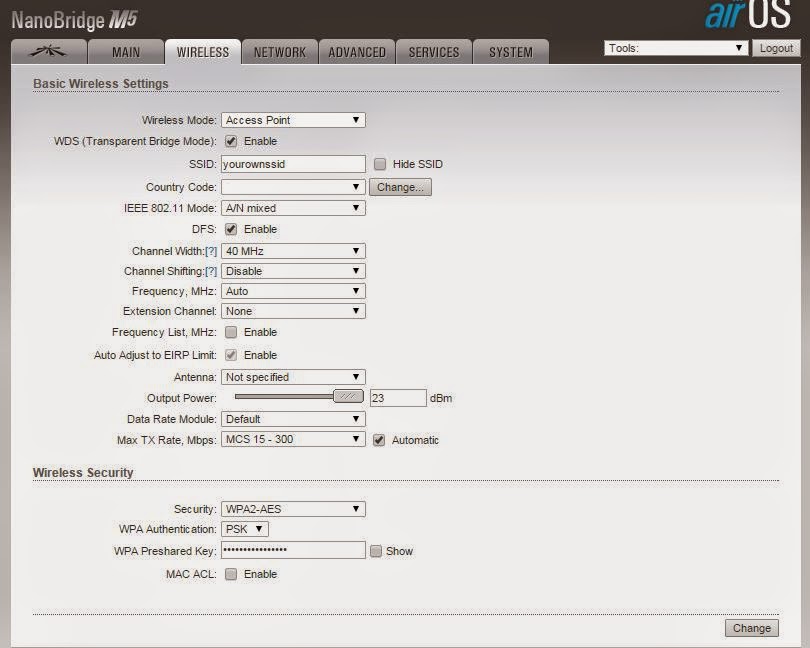
Let's do the setup for number 1 first - go to the Wirelss tab, and set the Wireless Mode to Access Point, and be sure to tick WDS (Transparent Bridge Mode) below it. Enter a SSID that is going to be used to identify your network to others (you can choose to hide this if you want).
At the bottom, in the Wireless Security section, ideally you want to secure your network, otherwise anyone can join in!
Set Security to WPA2-AES, and WPA Authentication to PSK. Then, type in a WPA Preshared Key - this is what people will have to type in if they want to connect to the Access Point.
That should do the trick, so hit Change at the bottom, and once again, don't forget to Apply the changes.
Make doubly sure that on the Network tab network mode is set to Bridge.
Now, for the second NanoBridge, we must set that one up as a Station - it's quite similar to the AP settings, but here you'll choose a SSID from a list (if you hit select, a box will pop up, and scan the surrounding area for wireless networks - simply choose the SSID you typed in on the first NanoBridge from the list):
Remember to enter your Preshared Key at the bottom, otherwise it won't work. Also, make sure this one is on the same Network subnet and IP range.
If you did everything right, you shouldn't have a problem connecting to each other.
My client's network performs very well - to test it, we copied a 1.4 gig file over in about 3-4 minutes - not bad at all (around 40mbps on average!).
I'm super impressed with the Ubiquiti NanoBridge M5, and if you want to set up a longer than normal range wifi connection between two buildings - as long as you have line of sight, this one should do the trick nicely. And the NanoBridge M5 is quite cheap too, in South Africa they go for around R1300 each, and it comes with almost everything you need (all the brackets, you basically just need a pole or something to mount it on of course). No network cables of course, those you'll have to either buy or make up yourself (you'll need 4 in total, 2 for each NanoBridge).
Now, I'm no expert in networking at all (I can set up a LAN and do some basic troubleshooting), but with my limited knowledge and watching a youtube clip or two, I managed to set this up no sweat! A lot easier than I though it'd be!


No comments:
Post a Comment